
Codex: A Practical Guide
A practical guide to OpenAI's Codex CLI: installing the right package, sandbox and approval modes, AGENTS.md, non-interactive automation, and MCP.
The first time I tried to install Codex I grabbed the wrong package and spent ten minutes debugging a coding agent from 2012. That's an easy mistake worth saving you from before we get to anything more interesting.
TL;DR
- Install
@openai/codex, notcodex. The unscoped package on npm is an unrelated project, the real one is scoped. - Start in read-only sandbox mode until you trust a prompt, then move to workspace-write.
- Run
/initto generate an AGENTS.md. It's Codex's equivalent of a CLAUDE.md, and it means Codex isn't relearning your repo's conventions every session. - Use
codex execfor scripted, non-interactive runs, a CI step or a batch job, instead of the interactive REPL. - Auto mode is workspace-write plus on-request approval. It edits and runs freely inside your project and only pauses for anything outside the sandbox.
- Set up MCP servers once in
config.toml, and the CLI, the IDE extension, and the desktop app all share them.
Install the right package
npm install -g @openai/codex
# or: brew install --cask codex
codex
Sign in with your ChatGPT account, which covers Plus, Pro, Business, Edu, and Enterprise plans, or configure an API key if you'd rather. Either way, don't npm install -g codex without the @openai/ scope. That command succeeds and installs something else entirely.
Sandbox modes and approval policies
Codex separates two questions that most tools bundle into one: what can it touch, and when does it need to ask first.
Sandbox modes control what it can touch:
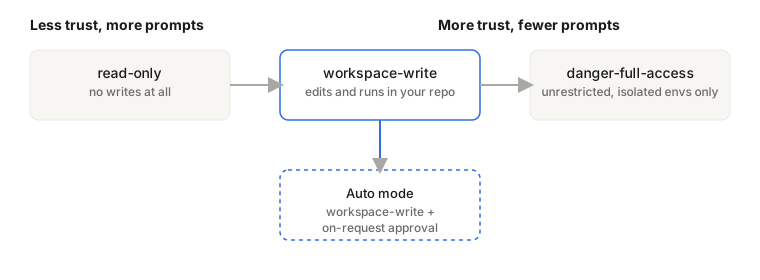 Read-only can't write anything. Workspace-write can edit and run inside your project. Danger-full-access is for environments that are already isolated, not your laptop.
Approval policies control when it has to ask: untrusted only skips confirmation for commands it already trusts, on-request lets Codex decide when to escalate, and never means denied operations just fail back to the model instead of interrupting you. Auto mode, the default most people land on, pairs workspace-write with on-request, which edits and runs freely inside your project and only stops you for anything that reaches outside it, like network access.
AGENTS.md
Run /init and Codex scaffolds an AGENTS.md from your repo: build commands, test commands, conventions worth knowing. It loads automatically every session after that, the same job a CLAUDE.md does for Claude Code. If you already wrote one for another agent, there's no reason to write a second one from scratch. The content is the same kind of thing regardless of which tool reads it.
Automate with codex exec
The interactive REPL is fine for exploratory work, but scripted automation wants something non-interactive:
codex exec --sandbox read-only "summarize risk in this diff"That's the shape I use in CI: read-only, one task, output captured and posted somewhere a human will actually see it. Here's a small Python wrapper around it for a scripted refactor across a list of directories:
import subprocess

def run_codex(prompt: str, directory: str, sandbox: str = "workspace-write") -> str:
    result = subprocess.run(
        ["codex", "exec", "--sandbox", sandbox, "--cd", directory, prompt],
        capture_output=True,
        text=True,
    )
    return result.stdout

targets = ["services/api", "services/worker", "services/gateway"]
for target in targets:
    output = run_codex("Rename the LegacyClient class to ApiClient and update imports.", target)
    print(f"{target}:\n{output}\n")
This is a starting point, not a finished pipeline. In practice you'd want to check each directory's diff before moving to the next one rather than trusting all three blindly, the same guardrail worth building into any loop.
MCP and multi model support
MCP configuration lives in ~/.codex/config.toml, shared across the CLI, the VS Code and JetBrains extensions, and the ChatGPT desktop app. Add a server with codex mcp add <name> -- <command> for a local stdio server, or hand write the TOML entry for a remote one. Switch models live with /model, or set a default in config.toml if you want every session to start on a specific one.
If you want more breakdowns like this, subscribe to the site or follow along on YouTube at @seeqcode.
Subscribe
New posts on AI, developer relations, photography, and the odd long walk, straight to your inbox. No spam.